Project Management
Projects define how work is organized, billed, and controlled within Colabmacs.
Every booking, usage session, and charge occurs within a project context, making projects the primary unit for financial control, access enforcement, and reporting.
Projects are owned by teams and can be configured with budgets, expiration dates, and project-scoped roles that allow fine‑grained delegation without granting global permissions.
Overview
Projects are used to:
- Group work under a shared purpose or funding source
- Track usage and charges
- Enforce financial and time‑based limits
- Delegate responsibility using project user roles
Users may belong to multiple projects, but can only work in one active project at a time.
Tips
If your facility does not require multiple projects, you can create a single default project and use it universally.
Key Concepts
What a Project Represents
A project encapsulates:
- Resource bookings
- Usage sessions and usage records
- Generated charges
- Budget limits
- Expiration rules
- Project‑scoped permissions
Every usage record and charge is always associated with exactly one project.
Project Ownership
- Projects are owned by Teams
- Each team has a single Team Owner, who is financially responsible
- Project access is granted by team membership
- Project‑level responsibilities are delegated using project user roles
Project Types and Billing
Project Types
Project Types categorize projects and determine how billing is applied.
Visibility
Project types that have the visibility of Public will be visible for users to select when creating new projects from the frontend.
Each Project Type:
- Is associated with a Rate Group
- May require administrative approval
- Determines how usage is priced
Default examples include:
- Academic
- Industrial
Managing Project Types
Navigate to Resources → Project Types.
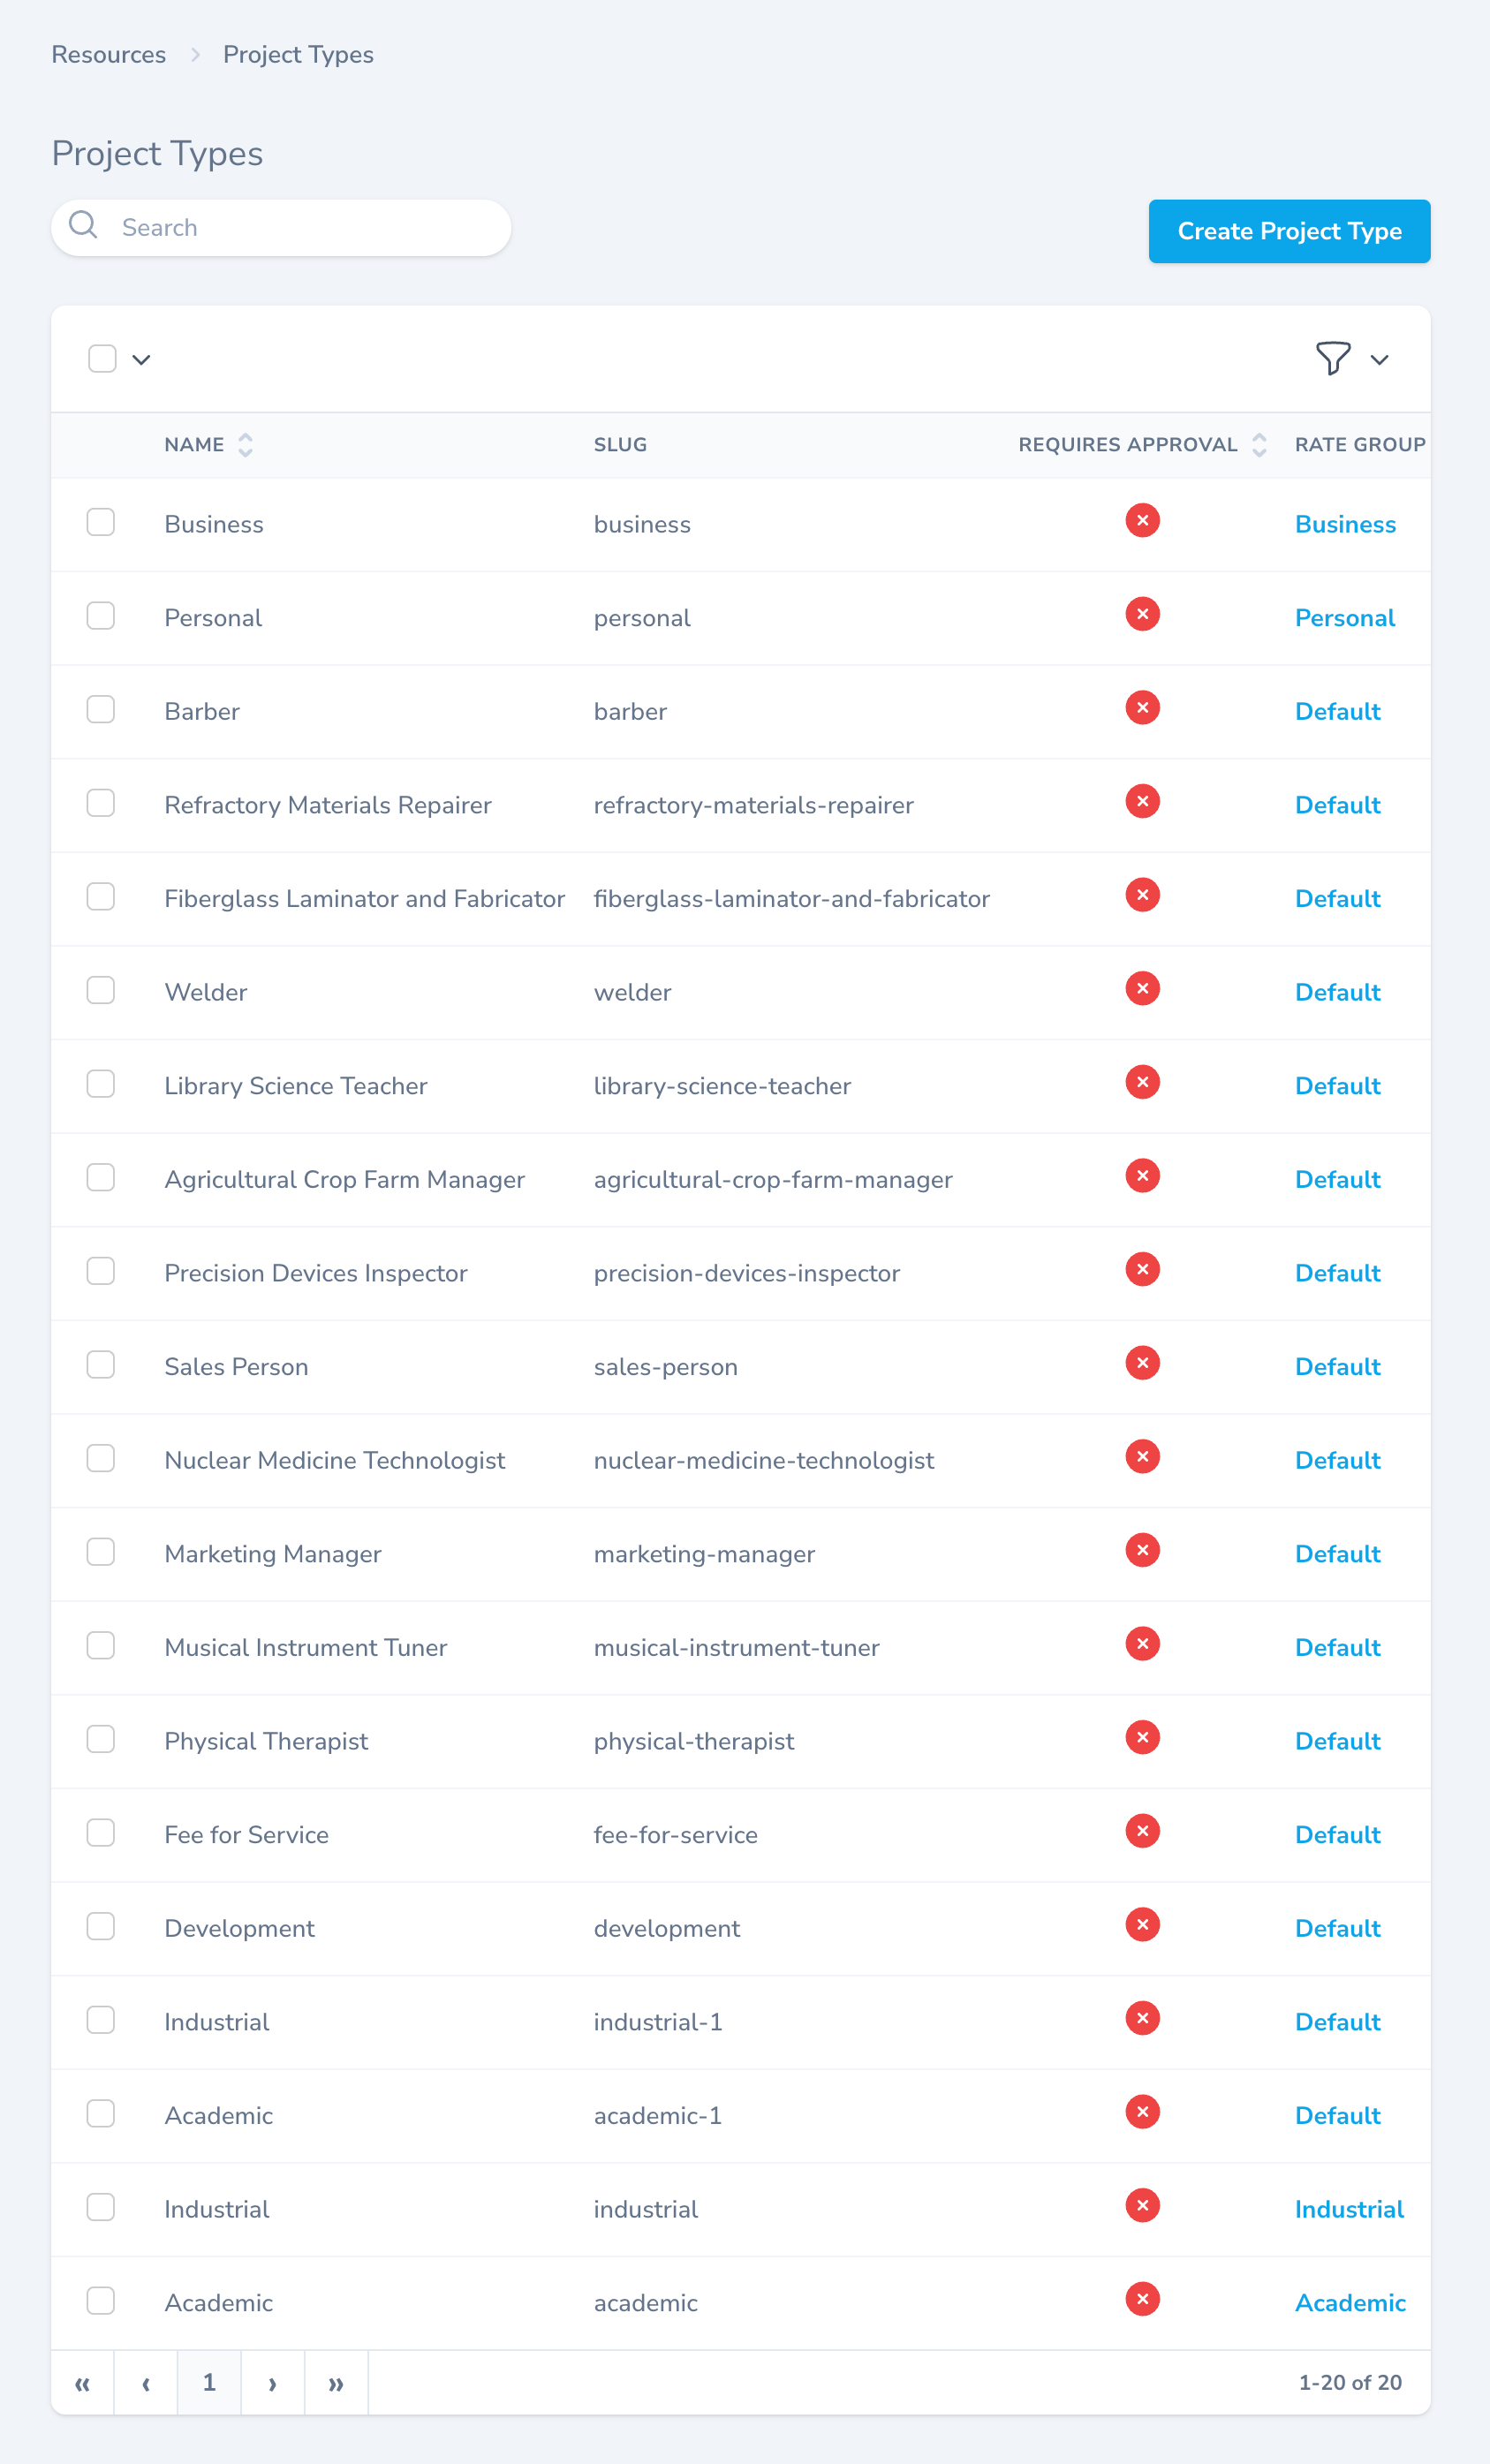
Each project type defines:
- Name and slug
- Approval requirement
- Associated rate group
- Optional
Billing Instructions. These will be added to any Invoice generated from a project of this type.
Tips
Project Types allow you to apply different pricing models without reconfiguring resources.
Projects Dashboard
Navigate to Resources → Projects.
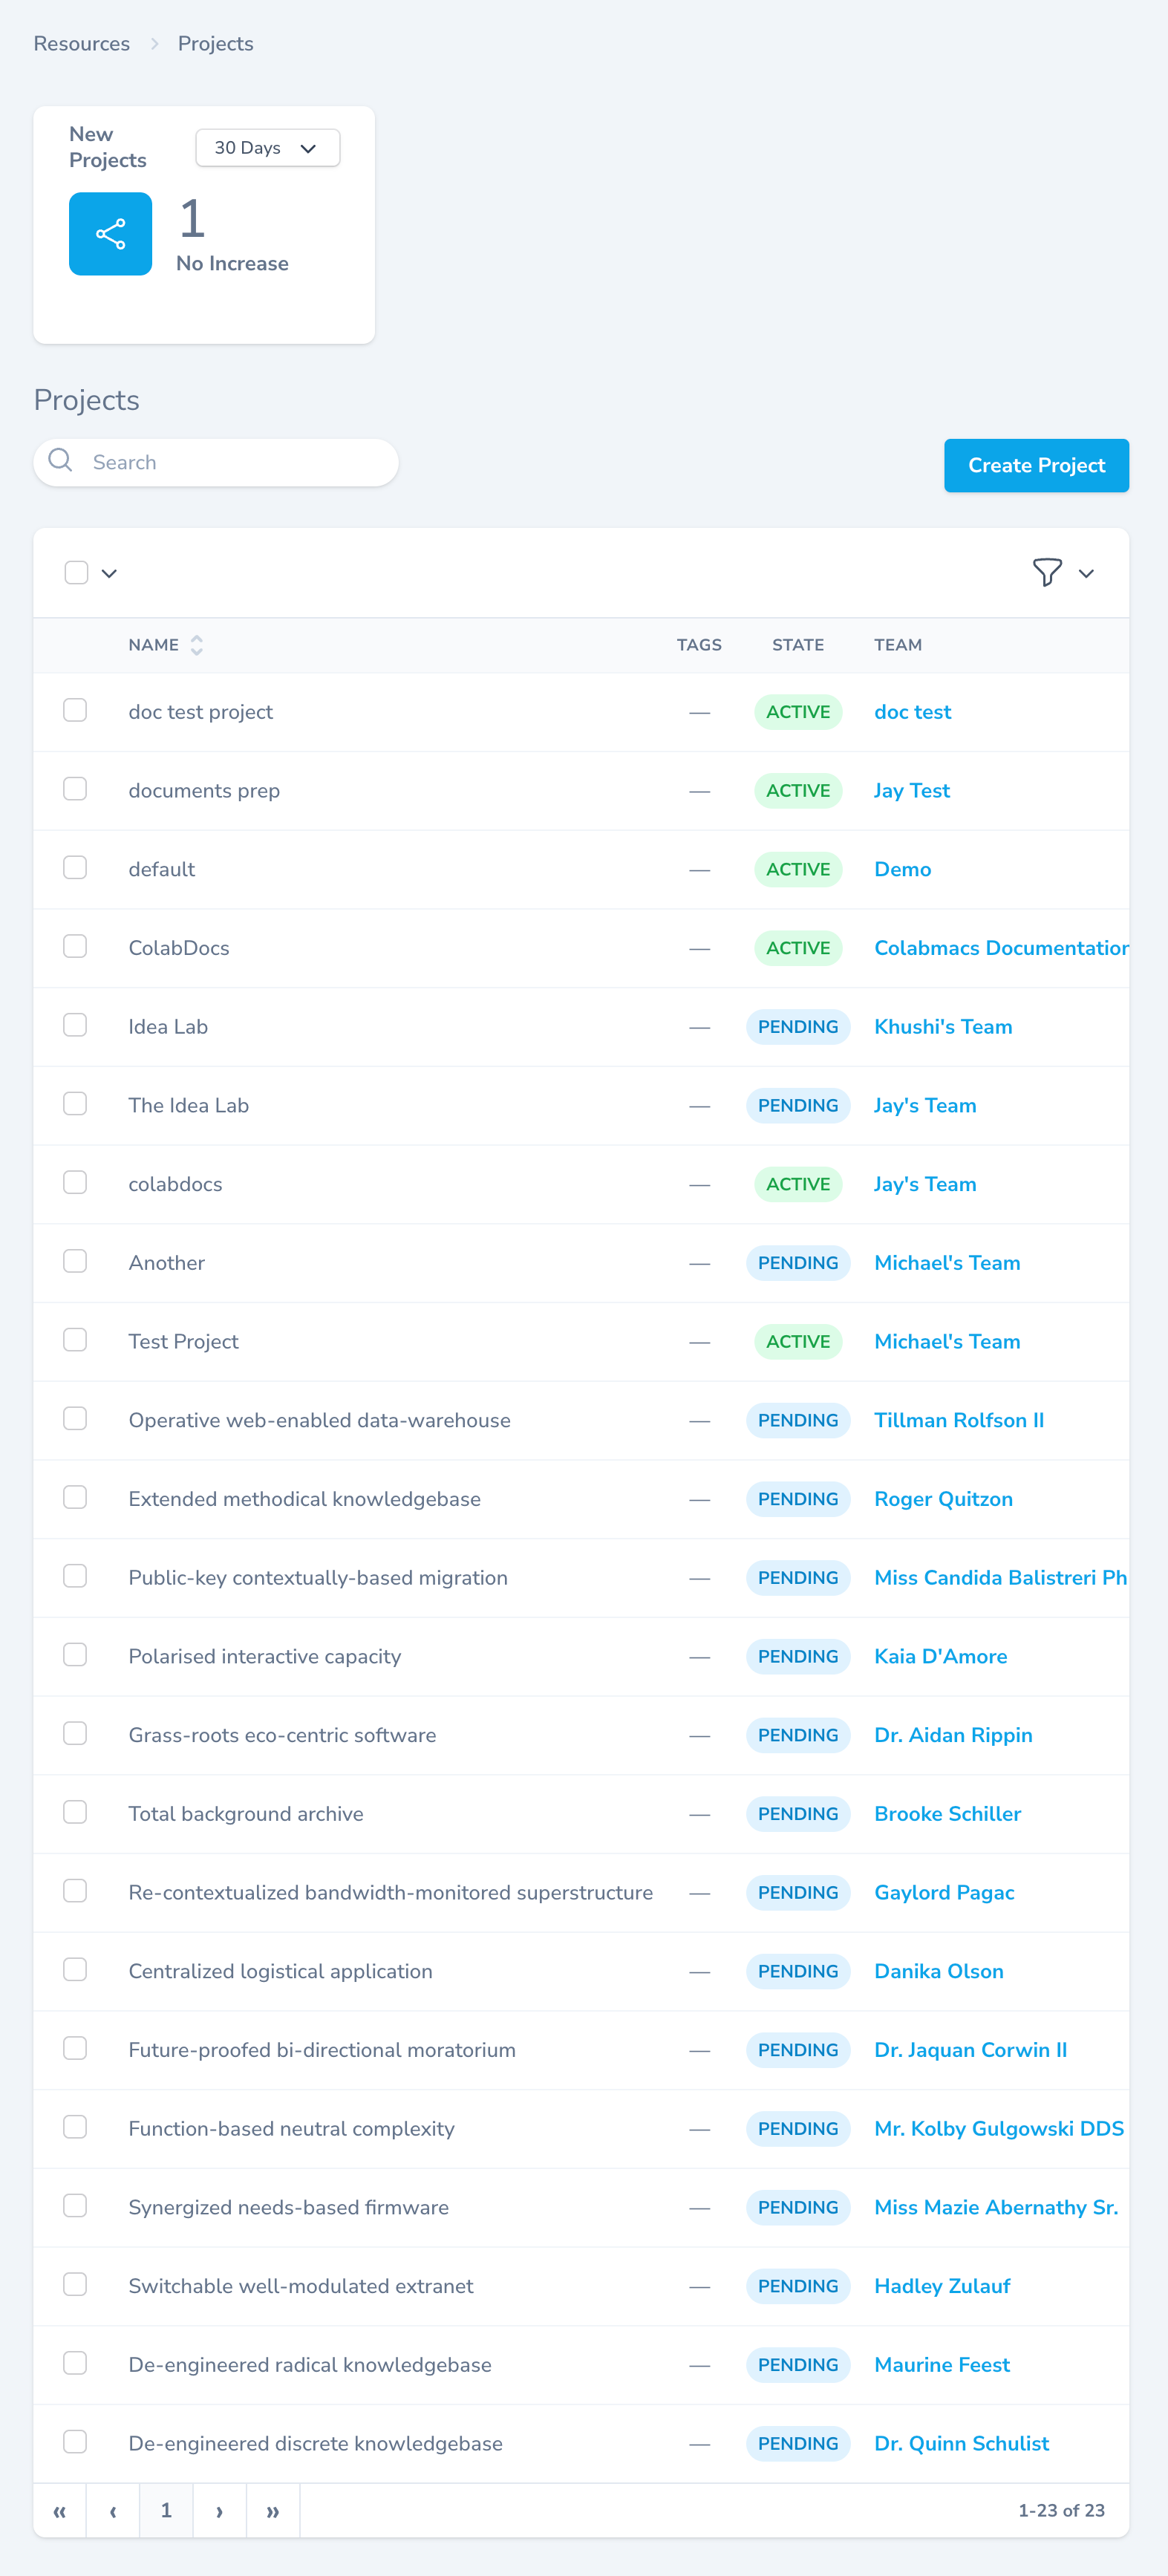
The projects dashboard provides:
- Visibility into active and pending projects
- Search and filtering tools
- Bulk management actions
Project States
| State | Meaning |
|---|---|
| Active | Project is usable |
| Pending | Awaiting approval |
| Suspended | Automatically restricted |
| Inactive | Manually disabled |
Budgets and Expiration Dates
Projects can be configured with financial and time‑based limits.
Project Budget
- Charges accumulate against the project budget
- Budgets are evaluated automatically
- Budgets can be updated at any time
Project Expiration Date
- After the expiration date, the project becomes suspended
- New bookings and usage are blocked
- Historical data remains visible
Automatic Project Suspension
Colabmacs runs scheduled background checks to enforce limits.
When suspended:
- ❌ New bookings are blocked
- ❌ Usage sessions cannot start
- ✅ Historical data remains visible
A project will automatically reactivate once limits are adjusted.
Project User Roles
Colabmacs supports project‑scoped roles, allowing permissions to be granted per project without affecting global access.
How Project Roles Work
- Roles are assigned to a project‑user relationship
- Only roles marked as public are selectable
- Permissions granted by the role are scoped to that project only
- System roles remain global and are not affected
Info
Although multiple roles are supported internally, the UI exposes a single role per project user to keep management simple.
Where Roles Are Managed
Project roles can be updated from either location:
- Projects → Project → Users
- Users → User → Projects
These controls appear alongside project‑user budgets and expiration dates.
Common Project Permissions
| Permission | Effect |
|---|---|
view projects | View project details |
manage events | Create, update, and manage project events |
manage usage sessions | Start and stop usage sessions |
manage usage records | Edit usage records |
manage charges | View and manage project charges |
manage project users | Add, remove, and update members |
Recommended Project Manager Role
A typical Project Manager role includes:
manage usage recordsmanage usage sessionsmanage chargesmanage eventsmanage projectsmanage project users
This allows the project manager to:
- Start and stop sessions
- Manage bookings
- View usage and charges
- Maintain project membership and settings
Project Details View
The project detail page includes:
Charges Table
- Searchable and filterable
- Shows all charges associated with the project
Active Usage Sessions
- Displays currently running sessions
- Users with permission may end sessions in real time
Usage History
- Complete usage record visibility
- Preserved even when projects are suspended
Project Bookings & Session Control
Users with the appropriate project‑scoped permissions may:
- Start usage sessions from bookings created by other project members
- Manage project workflow centrally
Warning
The user starting a session must still pass all activation rules.
We strongly recommend aligning activation rules with booking‑time training requirements.
Automatic Project Suspension
Colabmacs runs daily automated checks to enforce project limits.
A project will be automatically suspended if:
- The project exceeds its configured budget
- The project passes its expiration date
Reactivation
A suspended project will be automatically reactivated on the next system check if:
- The expiration date is extended
- The budget is increased
No manual reactivation is required.
Project User Limits
Projects may also enforce limits at the individual user level.
A project user can be automatically made inactive if:
- They exceed an individual project budget
- Their project access expires
Inactive project users:
- Remain members of the team
- Retain historical usage and charges
- Cannot create new bookings under that project
Booking-Time Budget Enforcement
Colabmacs supports a booking rule that evaluates cost before a reservation is confirmed.
When enabled:
- The system estimates the charge for a booking at creation time
- If the booking would cause:
- The project budget or
- The project user budget
to be exceeded, the booking is blocked
Tips
This prevents over-budget bookings before they occur, rather than correcting them after usage.
Best Practices
- Review and simplify project roles regularly
- Prefer project‑scoped roles over global roles
- Align booking and activation rules
- Monitor active sessions and charges
- Extend budgets and expiration dates proactively